Difference between revisions of "SRTM"
(→SRTM30 Global Terrain Data) |
|||
| (43 intermediate revisions by 2 users not shown) | |||
| Line 1: | Line 1: | ||
| + | ==Information== | ||
| + | There are 2 ways that SRTM data can be used with Pathloss 5. The data can be configured as a DEM and used for all profile and background generation or it can be used in conjunction with a bare earth DEM (such as [[NED data in GridFloat format]]) as a clutter database. The difference in elevation, when compared to a bare earth DEM is assigned to the clutter height. Both sets of instructions are given below. | ||
| − | + | SRTM data is collected by using a stereo radar scan of the earths surface. As a result the data tends to include the trees and buildings as these would be what reflects the radar signal. We say tends because there are variables, especially when dealing with trees. Depending on the tree type (deciduous or evergreen) and the time of year the data was collected, the heights could vary significantly. The radar signal also penetrates into the tree canopy to some degree. These variables need to be kept in mind when using SRTM as clutter. Additional caution needs to be exercised when using SRTM as a DEM, in particular the ground elevations at the antenna sites. It is always recommended to compare against elevations from a bare earth data source (if available), and use these for your site elevations. In North America the [[NED data in GridFloat format]] is excellent for this. It is not recommended to use clutter data when using SRTM as the DEM, as this would result in unrealistic clutter heights, almost doubling them in some cases. | |
| − | + | ||
| + | ==How to download== | ||
| − | + | The data can be downloaded using the [[FetchSRTM]] tool. This data is available for the world from latitude 60 degrees south to 60 degrees north. | |
| − | + | ||
| − | + | The files represent 1x1 degree blocks with naming representing the South Western corner of the block. The data files will have the extension '''.SRTMGL1.hgt.zip'''. | |
| − | |||
| − | + | == Using SRTM data as a DEM with the Pathloss 5 program. == | |
| − | '' | + | Click '''''Configure''''' - '''''Set GIS configuration''''' |
| − | |||
| − | + | [[File:GIS-SRTM.JPG]] | |
| − | |||
| − | + | Click the '''''Primary DEM''''' tab and select '''''SRTM (World)''''' from the '''''Digital elevation model''''' drop down list. | |
| − | + | Click the '''''File index''''' button and a new window will appear. In the menu of the new window click '''''Files''''' ,'''''Import index''''' and '''''SRTM hgt files'''''. | |
| − | |||
| − | + | [[File:SRTM-index.JPG]] | |
| − | + | ||
| − | + | ||
| − | + | ||
| − | + | ||
| − | + | ||
| − | |||
| − | + | Browse to locate the '''''HGT''''' files you have downloaded (You can select many HGT files at once by holding Ctrl or Shift while selecting files). Click '''''Open''''' and the files will be added to the index list. | |
| − | + | ||
| − | + | Note the edges of the SRTM file(s) and ensure that they cover the area of your project. In other words, make sure that the sites coordinates fall within the rectangle bounded by the North, South, East and West edges as listed for the SRTM file(s) in the index. | |
| − | + | You have now configured Pathloss 5 for SRTM terrain data. | |
| + | |||
| + | == Using SRTM data as Clutter with the Pathloss 5 program. == | ||
| − | + | When used with a bare earth DEM like [[NED data in GridFloat format]]. The Pathloss 5 program can be configured to take the difference between the elevations for a given point and assign this difference to the clutter height for that point. This feature is only used in profile generation and can not be used when viewing a background in the network view. | |
| − | |||
Click '''''Configure''''' - '''''Set GIS configuration''''' | Click '''''Configure''''' - '''''Set GIS configuration''''' | ||
| − | |||
| − | + | [[File:GIS-SRTM-clutter.jpg]] | |
| − | |||
| − | + | Click '''''Clutter 2''''' tab and select '''''BIL geographic clutter''''' from the '''''Clutter model''''' drop down list. | |
| − | + | Click the '''''Setup''''' button. | |
| − | |||
| − | You | + | [[File:GIS-SRTM-clutter-setup.jpg]] |
| + | |||
| + | |||
| + | Select the last option from '''''Clutter database format''''' and click the '''''OK''''' button. | ||
| + | |||
| + | |||
| + | '''''DIGRESSION:''''' | ||
| + | |||
| + | |||
| + | [[File:GIS-SRTM-clutter-setup3.jpg]] | ||
| + | |||
| + | |||
| + | Notice the the '''''Definition''''' button has disappeared. This is because the SRTM data can only provide heights not the classification of the clutter ie. trees, building etc. Pathloss 5 will use the '''''Default clutter category''''' and the '''''Tree foliage''''' setting to define the clutter. These options are set in the '''''Default calculation options''''' and the '''''Calculation options''''' in Pathloss 5 and Pathloss 5 Link respectively. | ||
| + | |||
| + | |||
| + | [[File:GIS-SRTM-clutter-default.jpg]] | ||
| + | |||
| + | |||
| + | '''''End DIGRESSION''''' and back to the setup... | ||
| + | |||
| + | |||
| + | [[File:GIS-SRTM-clutter-setup2.jpg]] | ||
| + | |||
| + | |||
| + | Click the '''''File index button''''' | ||
| + | |||
| + | |||
| + | [[File:GIS-SRTM-clutter-index.jpg]] | ||
| + | |||
| + | |||
| + | Click '''''Files - Import index - SRTM hgt files''''' | ||
| + | |||
| + | |||
| + | [[File:GIS-SRTM-clutter-index2.jpg]] | ||
| + | |||
| + | |||
| + | You can multi select file by holding '''''Ctrl''''' or '''''Shift''''' while selecting files. Click '''''Open''''' and the selected files will be indexed. Pathloss 5 is now configured to use SRTM as clutter. Make sure that the correct Clutter source is selected when generating profiles. These option are shown when generating profiles in the '''''Terrain data''''' section under '''''Configure - Generate profile''''' and also in the '''''Link design rules''''' when creating point to point and point to multi point links. | ||
== How to use the SRTM data with the Pathloss 4 program. == | == How to use the SRTM data with the Pathloss 4 program. == | ||
| Line 69: | Line 93: | ||
The SRTM data uses the WGS84 datum. Your coordinates will be transformed automatically. | The SRTM data uses the WGS84 datum. Your coordinates will be transformed automatically. | ||
| − | In the Pathloss program click | + | In the Pathloss program click '''''Configure – Terrain Database''''' and select '''''SRTM''''' from the drop down list. Click '''''Setup Primary''''' (or '''''Secondary''''' depending on your selection). Click '''''File''''' then '''''BIL-HDR-BLW''''' and browse to find and load a file with the HGT extension. The program is now setup to use the selected SRTM file. |
Latest revision as of 13:19, 11 October 2022
Contents |
Information
There are 2 ways that SRTM data can be used with Pathloss 5. The data can be configured as a DEM and used for all profile and background generation or it can be used in conjunction with a bare earth DEM (such as NED data in GridFloat format) as a clutter database. The difference in elevation, when compared to a bare earth DEM is assigned to the clutter height. Both sets of instructions are given below.
SRTM data is collected by using a stereo radar scan of the earths surface. As a result the data tends to include the trees and buildings as these would be what reflects the radar signal. We say tends because there are variables, especially when dealing with trees. Depending on the tree type (deciduous or evergreen) and the time of year the data was collected, the heights could vary significantly. The radar signal also penetrates into the tree canopy to some degree. These variables need to be kept in mind when using SRTM as clutter. Additional caution needs to be exercised when using SRTM as a DEM, in particular the ground elevations at the antenna sites. It is always recommended to compare against elevations from a bare earth data source (if available), and use these for your site elevations. In North America the NED data in GridFloat format is excellent for this. It is not recommended to use clutter data when using SRTM as the DEM, as this would result in unrealistic clutter heights, almost doubling them in some cases.
How to download
The data can be downloaded using the FetchSRTM tool. This data is available for the world from latitude 60 degrees south to 60 degrees north.
The files represent 1x1 degree blocks with naming representing the South Western corner of the block. The data files will have the extension .SRTMGL1.hgt.zip.
Using SRTM data as a DEM with the Pathloss 5 program.
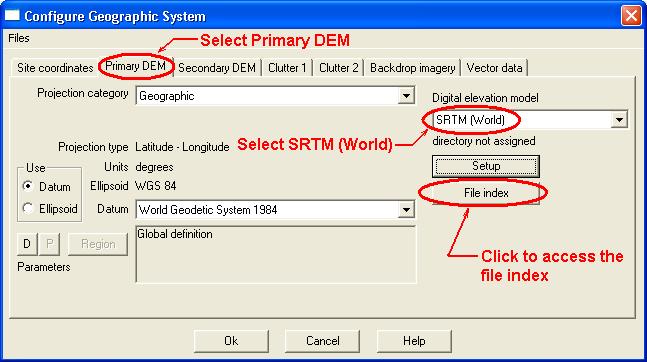
Click Configure - Set GIS configuration
Click the Primary DEM tab and select SRTM (World) from the Digital elevation model drop down list.
Click the File index button and a new window will appear. In the menu of the new window click Files ,Import index and SRTM hgt files.
Browse to locate the HGT files you have downloaded (You can select many HGT files at once by holding Ctrl or Shift while selecting files). Click Open and the files will be added to the index list.
Note the edges of the SRTM file(s) and ensure that they cover the area of your project. In other words, make sure that the sites coordinates fall within the rectangle bounded by the North, South, East and West edges as listed for the SRTM file(s) in the index.
You have now configured Pathloss 5 for SRTM terrain data.
Using SRTM data as Clutter with the Pathloss 5 program.
When used with a bare earth DEM like NED data in GridFloat format. The Pathloss 5 program can be configured to take the difference between the elevations for a given point and assign this difference to the clutter height for that point. This feature is only used in profile generation and can not be used when viewing a background in the network view.
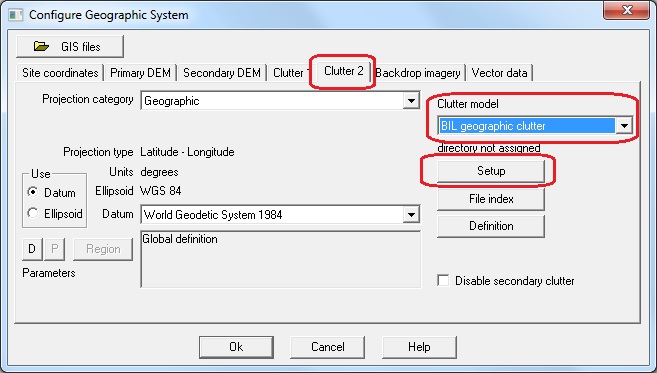
Click Configure - Set GIS configuration
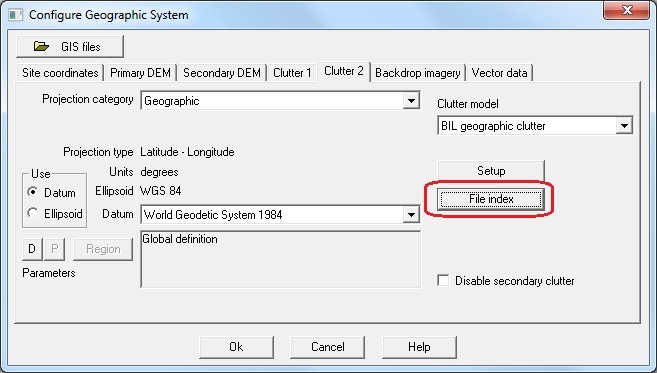
Click Clutter 2 tab and select BIL geographic clutter from the Clutter model drop down list.
Click the Setup button.
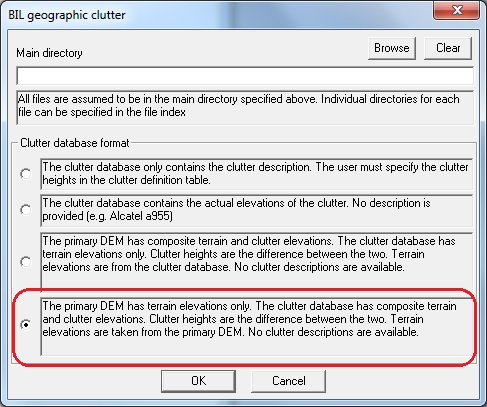
Select the last option from Clutter database format and click the OK button.
DIGRESSION:
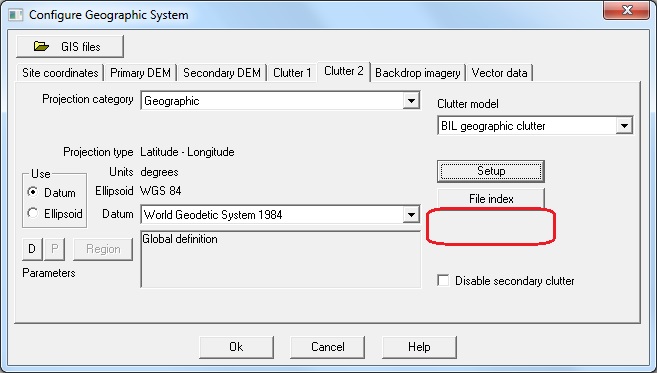
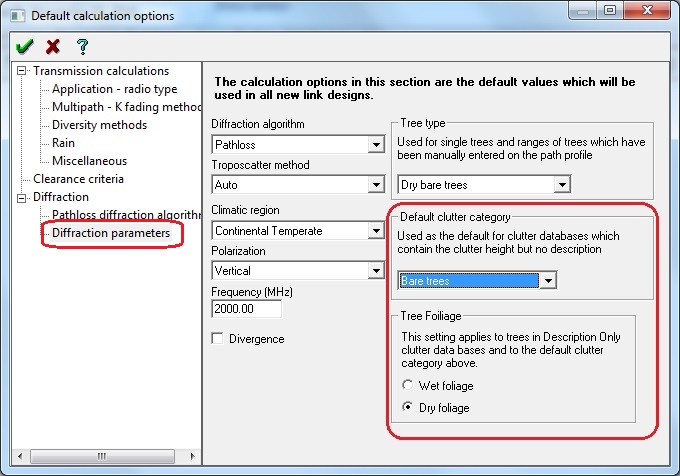
Notice the the Definition button has disappeared. This is because the SRTM data can only provide heights not the classification of the clutter ie. trees, building etc. Pathloss 5 will use the Default clutter category and the Tree foliage setting to define the clutter. These options are set in the Default calculation options and the Calculation options in Pathloss 5 and Pathloss 5 Link respectively.
End DIGRESSION and back to the setup...
Click the File index button
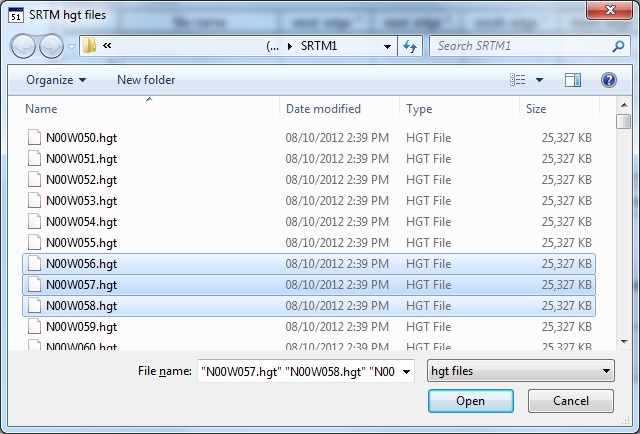
Click Files - Import index - SRTM hgt files
You can multi select file by holding Ctrl or Shift while selecting files. Click Open and the selected files will be indexed. Pathloss 5 is now configured to use SRTM as clutter. Make sure that the correct Clutter source is selected when generating profiles. These option are shown when generating profiles in the Terrain data section under Configure - Generate profile and also in the Link design rules when creating point to point and point to multi point links.
How to use the SRTM data with the Pathloss 4 program.
You will need the latest version of the Pathloss program.
The SRTM data uses the WGS84 datum. Your coordinates will be transformed automatically.
In the Pathloss program click Configure – Terrain Database and select SRTM from the drop down list. Click Setup Primary (or Secondary depending on your selection). Click File then BIL-HDR-BLW and browse to find and load a file with the HGT extension. The program is now setup to use the selected SRTM file.
